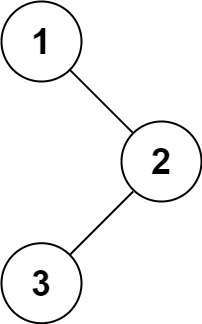
给你二叉树的根节点 root ,返回它节点值的 前序 __ 遍历。
示例 1:

**输入:** root = [1,null,2,3]
**输出:** [1,2,3]
示例 2:
**输入:** root = []
**输出:** []
示例 3:
**输入:** root = [1]
**输出:** [1]
示例 4:
**输入:** root = [1,2]
**输出:** [1,2]
示例 5:
**输入:** root = [1,null,2]
**输出:** [1,2]
提示:
- 树中节点数目在范围
[0, 100] 内
-100 <= Node.val <= 100
进阶: 递归算法很简单,你可以通过迭代算法完成吗?
X.遍历二叉树的方法合集
- 二叉树的中序遍历
- 二叉树的前序遍历
- 二叉树的后序遍历
文章有一点长,代码居多。会给出比较详细的动画演示以及视频讲解请大家耐心阅读。
递归解法
前序遍历
[sol1-Java]1
2
3
4
5
6
7
8
| public static void preOrderRecur(TreeNode head) {
if (head == null) {
return;
}
System.out.print(head.value + " ");
preOrderRecur(head.left);
preOrderRecur(head.right);
}
|
中序遍历
[sol1-Java]1
2
3
4
5
6
7
8
| public static void preOrderRecur(TreeNode head) {
if (head == null) {
return;
}
preOrderRecur(head.left);
System.out.print(head.value + " ");
preOrderRecur(head.right);
}
|
后序遍历
[sol1-Java]1
2
3
4
5
6
7
8
| public static void postOrderRecur(TreeNode head) {
if (head == null) {
return;
}
postOrderRecur(head.left);
postOrderRecur(head.right);
System.out.print(head.value + " ");
}
|
代码解释
这里没有对递归遍历做过多的解释,仅仅给出了简单的动画演示。
要理解递归的思路并且熟练的使用它,就是要想清楚你想做什么,什么时候停止。
如前序遍历:
我想先打印头节点对吧?那我打印完了头节点,我现在想打印左边节点了,我只是告诉计算机我想打印左边结点,之后打印右边结点。
那么后序遍历呢?
这个时候你应该知道了,我就是想操作左边然后右边,最后打印中间的元素。
我们并不需要太过于在意具体的递归过程,而是要想清楚让计算机干什么。
> 计算机都可能溢出,用人脑去遍历就不现实了。
迭代解法
本质上是在模拟递归,因为在递归的过程中使用了系统栈,所以在迭代的解法中常用 Stack 来模拟系统栈。
前序遍历
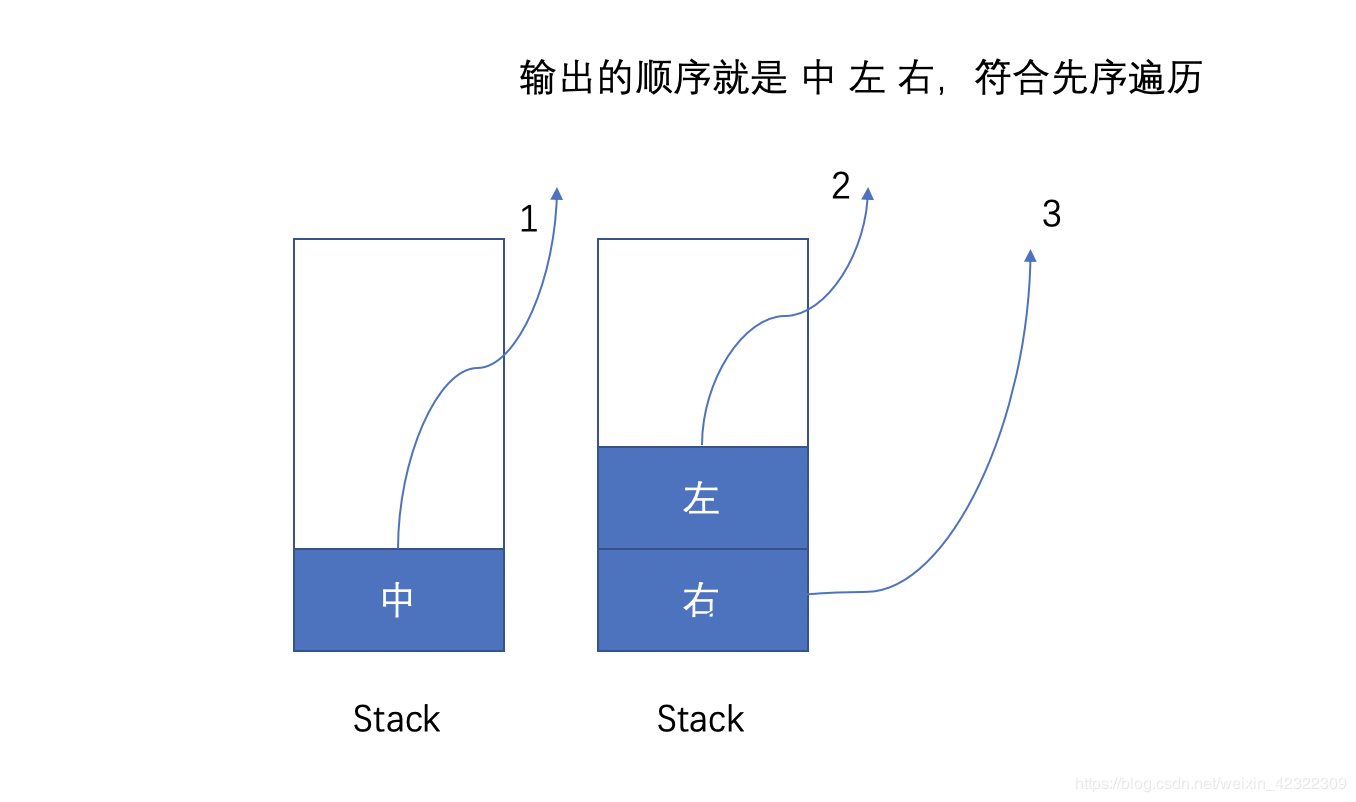
首先我们应该创建一个 Stack 用来存放节点,首先我们想要打印根节点的数据,此时 Stack 里面的内容为空,所以我们优先将头结点加入 Stack,然后打印。
之后我们应该先打印左子树,然后右子树。所以先加入 Stack 的就是右子树,然后左子树。
此时你能得到的流程如下:
{:width=”500px”}{:align=”center”}
[sol1-Java]1
2
3
4
5
6
7
8
9
10
11
12
13
14
15
16
17
| public static void preOrderIteration(TreeNode head) {
if (head == null) {
return;
}
Stack<TreeNode> stack = new Stack<>();
stack.push(head);
while (!stack.isEmpty()) {
TreeNode node = stack.pop();
System.out.print(node.value + " ");
if (node.right != null) {
stack.push(node.right);
}
if (node.left != null) {
stack.push(node.left);
}
}
}
|
中序遍历
- 同理创建一个
Stack,然后按 左 中 右的顺序输出节点。
- 尽可能的将这个节点的左子树压入
Stack,此时栈顶的元素是最左侧的元素,其目的是找到一个最小单位的子树(也就是最左侧的一个节点),并且在寻找的过程中记录了来源,才能返回上层,同时在返回上层的时候已经处理完毕左子树了。。
- 当处理完最小单位的子树时,返回到上层处理了中间节点。(如果把整个左中右的遍历都理解成子树的话,就是处理完
左子树->中间(就是一个节点)->右子树)
- 如果有右节点,其也要进行中序遍历。
{:width=”300px”}{:align=”left”}
当整个左子树退栈的时候这个时候输出了该子树的根节点 2,之后输出中间节点 1。然后处理根节点为3右子树。
[sol1-Java]1
2
3
4
5
6
7
8
9
10
11
12
13
14
15
16
17
18
| public static void inOrderIteration(TreeNode head) {
if (head == null) {
return;
}
TreeNode cur = head;
Stack<TreeNode> stack = new Stack<>();
while (!stack.isEmpty() || cur != null) {
while (cur != null) {
stack.push(cur);
cur = cur.left;
}
TreeNode node = stack.pop();
System.out.print(node.value + " ");
if (node.right != null) {
cur = node.right;
}
}
}
|
后序遍历
代码片段 1
- 前序遍历的过程 是 中左右。
- 将其转化成 中右左。也就是压栈的过程中优先压入左子树,在压入右子树。
- 然后将这个结果返回来,这里是利用栈的先进后出倒序打印。
[sol1-Java]1
2
3
4
5
6
7
8
9
10
11
12
13
14
15
16
17
18
19
20
21
| public static void postOrderIteration(TreeNode head) {
if (head == null) {
return;
}
Stack<TreeNode> stack1 = new Stack<>();
Stack<TreeNode> stack2 = new Stack<>();
stack1.push(head);
while (!stack1.isEmpty()) {
TreeNode node = stack1.pop();
stack2.push(node);
if (node.left != null) {
stack1.push(node.left);
}
if (node.right != null) {
stack1.push(node.right);
}
}
while (!stack2.isEmpty()) {
System.out.print(stack2.pop().value + " ");
}
}
|
代码片段 2
- 用一个指针
cur 标记当前退出的节点是什么。
- 后序遍历的过程中在遍历完左子树跟右子树
cur 都会回到根结点。所以当前不管是从左子树还是右子树回到根结点都不应该再操作了,应该退回上层。
- 如果是从右边再返回根结点,应该回到上层。
[sol1-Java]1
2
3
4
5
6
7
8
9
10
11
12
13
14
15
16
17
18
19
| public static void postOrderIteration2(TreeNode head) { 感谢[@ben-ben-niu](/u/ben-ben-niu/)指出错误,代码确实存在问题,已经在原文中修复
if (head == null) {
return;
}
TreeNode cur = head;
Stack<TreeNode> stack = new Stack<>();
stack.push(head);
while (!stack.isEmpty()) {
TreeNode peek = stack.peek();
if (peek.left != null && peek.left != cur && peek.right != cur) {
stack.push(peek.left);
} else if (peek.right != null && peek.right != cur) {
stack.push(peek.right);
} else {
System.out.print(stack.pop().val + " ");
cur = peek;
}
}
}
|
Morris解法
遍历使用二叉树节点中大量指向 ```null``` 的指针,由 Joseph Morris 于 1979 年发明。1
2
3
4
5
6
7
8
9
10
11
12
13
14
15
16
17
18
19
20
21
22
23
24
25
26
27
28
29
30
31
32
| 时间复杂度:$O(n)$
额外空间复杂度:$O(1)$
在你阅读以下代码之前,在这边先讲解一下 ```Morris``` 的通用解法过程。
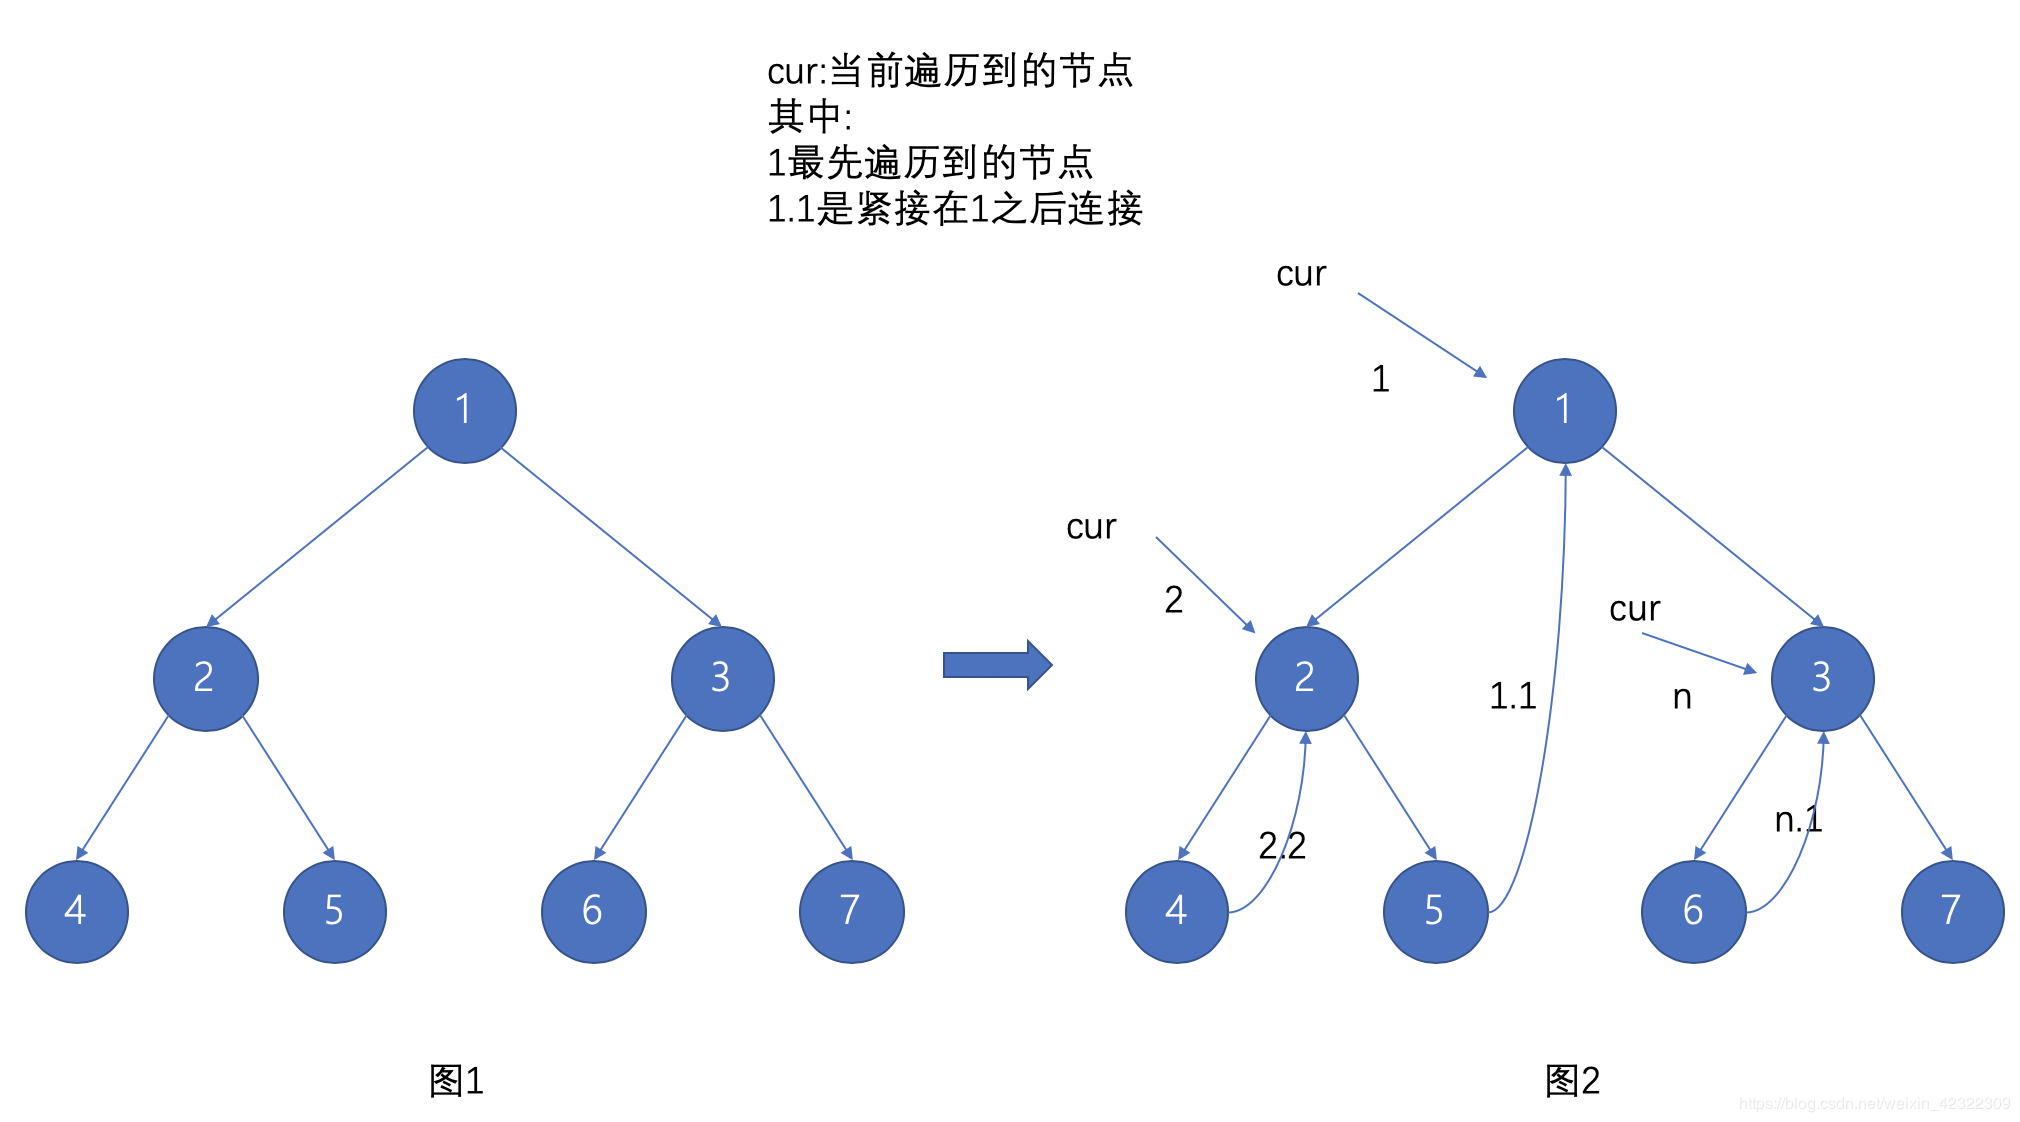
```Morris``` 的整体思路就是将 *以某个根结点开始,找到它左子树的最右侧节点之后与这个根结点进行连接*
我们可以从 **图2** 看到,如果这么连接之后,**cur** 这个指针是可以完整的从一个节点顺着下一个节点遍历,将整棵树遍历完毕,直到 **7** 这个节点右侧没有指向。
```Java [sol1-Java]
public static void preOrderMorris(TreeNode head) {
if (head == null) {
return;
}
TreeNode cur1 = head;//当前开始遍历的节点
TreeNode cur2 = null;//记录当前结点的左子树
while (cur1 != null) {
cur2 = cur1.left;
if (cur2 != null) {
while (cur2.right != null && cur2.right != cur1) {//找到当前左子树的最右侧节点,且这个节点应该在指向根结点之前,否则整个节点又回到了根结点。
cur2 = cur2.right;
}
if (cur2.right == null) {//这个时候如果最右侧这个节点的右指针没有指向根结点,创建连接然后往下一个左子树的根结点进行连接操作。
cur2.right = cur1;
cur1 = cur1.left;
continue;
} else {//当左子树的最右侧节点有指向根结点,此时说明我们已经回到了根结点并重复了之前的操作,同时在回到根结点的时候我们应该已经处理完 左子树的最右侧节点 了,把路断开。
cur2.right = null;
}
}
cur1 = cur1.right;//一直往右边走,参考图
}
}
|
前序遍历
- 在某个根结点创建连线的时候打印。因为我们是顺着左边的根节点来创建连线,且创建的过程只有一次。
- 打印某些自身无法创建连线的节点,也就是叶子节点。
[sol1-Java]1
2
3
4
5
6
7
8
9
10
11
12
13
14
15
16
17
18
19
20
21
22
23
24
25
26
| public static void preOrderMorris(TreeNode head) {
if (head == null) {
return;
}
TreeNode cur1 = head;
TreeNode cur2 = null;
while (cur1 != null) {
cur2 = cur1.left;
if (cur2 != null) {
while (cur2.right != null && cur2.right != cur1) {
cur2 = cur2.right;
}
if (cur2.right == null) {
cur2.right = cur1;
System.out.print(cur1.value + " ");
cur1 = cur1.left;
continue;
} else {
cur2.right = null;
}
} else {
System.out.print(cur1.value + " ");
}
cur1 = cur1.right;
}
}
|
中序遍历
从最左侧开始顺着右节点打印。也就是在将 cu1 切换到上层节点的时候。
[sol1-Java]1
2
3
4
5
6
7
8
9
10
11
12
13
14
15
16
17
18
19
20
21
22
23
24
25
26
| public static void inOrderMorris(TreeNode head) {
if (head == null) {
return;
}
TreeNode cur1 = head;
TreeNode cur2 = null;
while (cur1 != null) {
cur2 = cur1.left;
if (cur2 != null) {
while (cur2.right != null && cur2.right != cur1) {
cur2 = cur2.right;
}
if (cur2.right == null) {
cur2.right = cur1;
cur1 = cur1.left;
continue;
} else {
cur2.right = null;
}
}
System.out.print(cur1.value + " ");
cur1 = cur1.right;
}
}
|
后序遍历
后序遍历就比较复杂了哈,先看一下图
{:width=”400px”}{:align=”center”}
当我们到达最左侧,也就是左边连线已经创建完毕了。
打印 4
打印 5 2
打印 6
打印 7 3 1
我们将一个节点的连续右节点当成一个单链表来看待。
当我们返回上层之后,也就是将连线断开的时候,打印下层的单链表。
比如返回到 2,此时打印 4
比如返回到 1,此时打印 5 2
比如返回到 3,此时打印 6
那么我们只需要将这个单链表逆序打印就行了,下文也给出了 单链表逆序代码
这里不应该打印当前层,而是下一层,否则根结点会先与右边打印。
[sol1-Java]1
2
3
4
5
6
7
8
9
10
11
12
13
14
15
16
17
18
19
20
21
22
23
24
25
26
27
28
29
30
31
32
33
34
35
36
37
38
39
40
41
42
43
44
45
46
47
48
|
public static void postOrderMorris(TreeNode head) {
if (head == null) {
return;
}
TreeNode cur1 = head;
TreeNode cur2 = null;
while (cur1 != null) {
cur2 = cur1.left;
if (cur2 != null) {
while (cur2.right != null && cur2.right != cur1) {
cur2 = cur2.right;
}
if (cur2.right == null) {
cur2.right = cur1;
cur1 = cur1.left;
continue;
} else {
cur2.right = null;
postMorrisPrint(cur1.left);
}
}
cur1 = cur1.right;
}
postMorrisPrint(head);
}
public static void postMorrisPrint(TreeNode head) {
TreeNode reverseList = postMorrisReverseList(head);
TreeNode cur = reverseList;
while (cur != null) {
System.out.print(cur.value + " ");
cur = cur.right;
}
postMorrisReverseList(reverseList);
}
public static TreeNode postMorrisReverseList(TreeNode head) {
TreeNode cur = head;
TreeNode pre = null;
while (cur != null) {
TreeNode next = cur.right;
cur.right = pre;
pre = cur;
cur = next;
}
return pre;
}
|
感谢收看


 {:width=”500px”}{:align=”center”}
 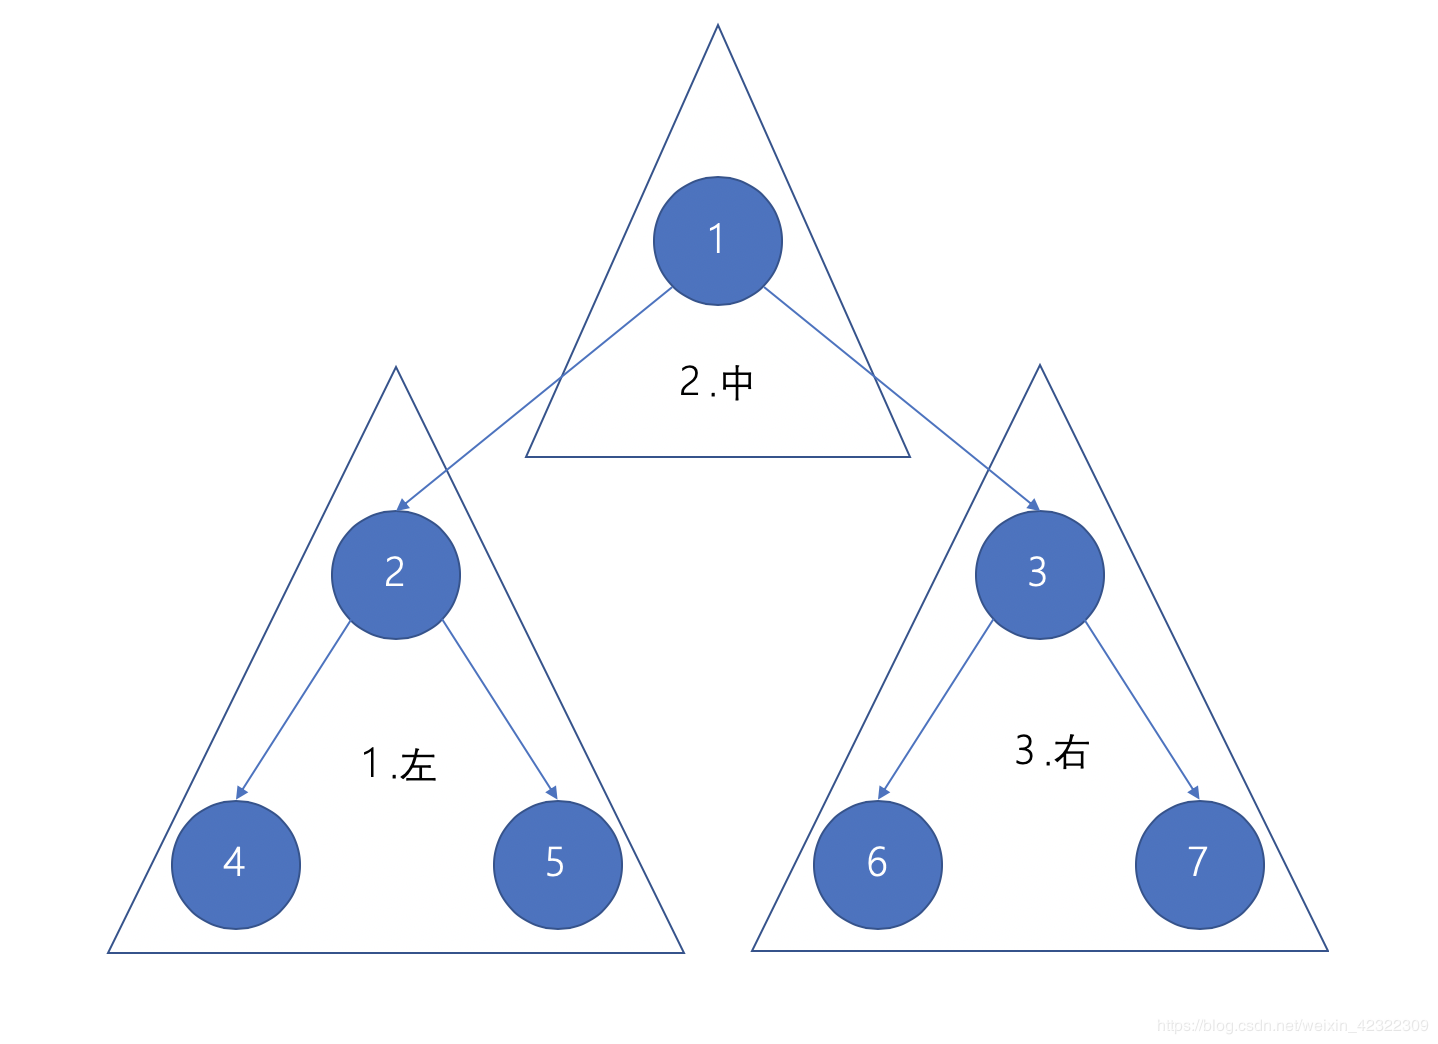 {:width=”300px”}{:align=”left”}
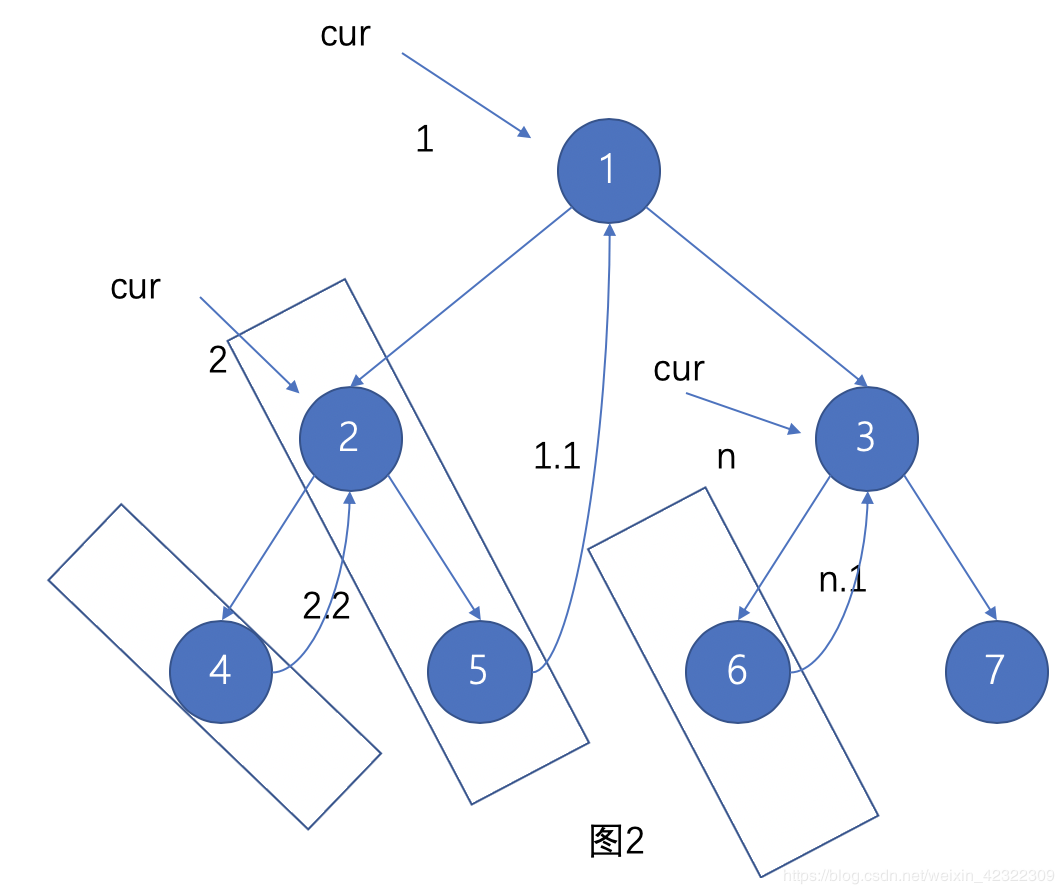 {:width=”400px”}{:align=”center”}